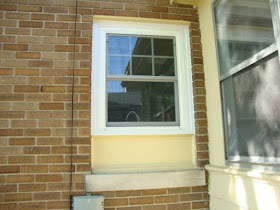
This is the first step to finishing off the outside of the 2 new windows we put in the kitchen at the start of the kitchen remodel. The window on the west side of the house had to be shrunk to fit cabinets and counters along that wall. So, a smaller window meant a gap of space where the old window used to be...
You can see the plywood showing in the gap. It's been sitting like that since last summer. So, we're hoping to get this all closed up so that from the outside it looks complete.
The project will be done in several steps. The first step is what I'm covering today - adding trim around the windows. You can see in the picture below, that once the windows were installed and screwed tight, the screws and everything around the window were still exposed.
This is ugly and very unfinished looking. So, Joey took some measurements...
And we made a trip to good ol' Menards and bought vinyl trim boards in white. The vinyl trim is good for the outside...keep rain out etc. Joey also bought some other trim fillers that were needed to fill some depth of space behind the vinyl trim. There are actually 3 layers to this process.
When we got home, Joey got right to work. He cut some wood strips to fill space behind the trim and nailed it tight around the window...
...all sides. Squeezing the wood between the window and brick required a little hammering, but we know it's good and tight.
Once the boards were wrapped around the window, the first layer of vinyl trim was cut using a saw (but I forget which kind - Joey, help me out!)...
...and nailed into place. Joey started with the top strip and made it the full width of the trim.
Then he slid the 2 side strips into place and nailed them too.
Joey explained that you want the top strip to go all the way across the width of the window so that water (from rain/snow) will drip down over the other trim pieces and not get underneath the sides or bottom. As we all know, water damage = bad news.
Here's the window with the vinyl on all 4 sides...
After Joey got this part done, we had a convo that went like this:
Katie: Wow, that looks so much better now that you can't see the screws. I really like it! Good job!
Joey: Um, it's not done.
Katie: What do you mean the trim's not done? You just finished nailing the white trim all around the window.
Joey: This was just to protect the window from weather elements. The final trim piece that will make it looks nice comes next.
Katie: (scratching my head) Huh?
To which Joey walked away and kept sawing more trim pieces. He cut them at an angle (which angle, Joey?) like you would cut wood molding for around the windows inside the house.
Then the pretty trim got all snuggly tight with brick and nailed in place. They don't cover the full vinyl trim piece that's underneath it - just the outer edge. It's all in the details, people.
Fast forward to all 4 sides done...now that looks good!
I did my second happy dance for the day to which Joey replied, "There's one more step." I gave another befuddled look not imaging what it could be, and he pulled out a gun...
Caulk gun that is (did I scare you?)! See all the little gaps between the trim and brick mortar? Those have to be filled in nice and tight. Joey said, "we don't want spiders making little nests in there." And I whole-heartedly agreed!
See? Snug as a bug in a rug.
Oh, happy day! One step down, a few to go. But big improvement, huh?
Joey actually did the same trim process with the other kitchen window around the corner. It went from this...
to this...
This window had already been replaced in a smaller size by the owners before us. They boxed in the bottom and painted it. We're going to use that same boxed-in method below the bigger window and then add brick up the side of the bigger window to match the rest of the brick.
Oh, and we want to replace just about every window in the house eventually. That will be quite the project!
As always, we'll share as we go!


No comments:
Post a Comment