April 14, 2011

Bush-Whacked!

This is the most recent picture of the front of our house that I could find (taken right after the blizzard)...


I love the outside of our house, BUT since the dawn of this house purchase, we have been wanting to get rid of those bushes that crowd along the entire front of the house. They block some of the pretty features of the brick and impede the walkway to the front door.

I shared with you a couple of weeks ago some of the work we had already started doing on the landscaping of this yard - primarily digging out un-wanted plants on the side of the house. But imagine my surprise when I got home from work the other day and found Joey with a chainsaw in hand whacking these front bushes to death...


Half the bushes were already missing by the time I arrived on the scene to snap a few pictures of the progress (so sorry there's no "before" pic).

The original plan was to have the bushes yanked out of the ground using the tow-strap and SUV/Truck method we used last fall, but alas, Joey explained the trunks of these particular bushes were so big and strong that it broke the tow-strap in 2 seconds of trying that method.

So, Joey's Plan B was to take a chainsaw to 'em and cut them down as low as they would go, and then dig the rest of the roots out of the ground. Plan B = More work, Less fun. Well, Joey had fun with the chainsaw, I guess.

The bush that stuck out into the pathway to the front of the house took the longest to dismantle. Once Joey trimmed part of the bush away, we could see someone had hung 2 bricks in the center of the bush (anyone with landscaping experience know why this was done?). Eventually, he trimmed down to the "trunk" and then cut across that to remove as much as possible.


Whew! The front already looks so much more open and inviting with no bushes! And we still have new flowers to plant to add more curb appeal.


This picture gives you a little insight into what lays behind the bushes: an ugly hose-holder, a pipe that comes from the basement and sticks straight out of the house (to drain the sump pump), the stumps/roots from the bushes, and bunch of leaves and junk to rake up. We have much clean-up to do.


One item I do love is the window box that sits on top of the cement corbels. The box itself is old and rotting, but Joey plans to build a new box. It will be so pretty sitting in front of the house once it's bursting with flowers. The cement corbels under the box, the cement window sills, and the cement "corners" are some of the details I love about the outside of the house. We want to do our best to show them off.


So, here's what we were left with at the end of the day. It will all get hauled to the dump to be added to the compost piles. Anyone have a large truck bed and want to help?


I just love that I can finally see THE HOUSE in it's entirety and can't wait to start planting pretty things around it. So much work, but so worth it!


Now to dig those thick, deep roots out of the ground... we'll get to it whenever spring weather decides to show up again! Pin It

April 13, 2011

Neutral Wednesday

It's Wednesday! What better way to get us over the hump of the week than a few good photos, right? All the rooms below have a common theme - a Neutral Color Scheme. It's very soothing. Peaceful. Relaxing. Here we go...

Room #1: I love the copper vent hood above the range. It stands out so nicely against the white subway tile backsplash. The size of the hood is proportionate to the large kitchen and high ceilings.


Room #2: I love the marble counter. I just love marble. Period. The little swing arm sconce is a nice detailed touch that provides some ample task lighting. Everything is nice and symmetrical - just the way I like it (most of the time).


Room #3: Another bunk room? Yes! These built-in bunk rooms are just popping up everywhere. But they are so practical, I don't see how this trend can get old. I like the little curtains you can pull across each bunk for privacy. And this room stepped it up with a microwave and mini-fridge. Pure luxury. Great pull out drawers under the bunks too.


Room #4: I love the beadboard ceilings with the cross beams. So architecturally pretty. The creamy colored cabinets stand out beautifully against the white walls. And here's another great range hood for ya. I also love the nailhead trim on the bar stools.


Room #5: I love everything in this room: The high ceiling with the exposed rafters. The beautiful white buffet. The bench seating combo'd with the table and chairs. The many windows that let in so much light. The curtain rods that run along the entire length of the walls. Everything.


Room #6: I love, love, love the picture frame collage in above the bed.


Room #7: I love painted cabinets and roman shade. They coordinate so well. And the potted plants add life and color to the room.


Pictures courtesy of Urban Grace Interiors


So, what do you think of the neutral color scheme? Classic? Boring? Versatile?

You be the judge. Pin It

April 12, 2011

Shout Out: The Lettered Cottage - Reading Room Redo

One of my favorite blogs is The Lettered Cottage. Layla Palmer writes her interior design blog and has done a fabulous job of transforming their ranch house into a cottage-styled home.

Many of you have seen pictures of her house across the web, but one room that stands out is a little 6 foot by 6 foot room that was turned into a reading nook. Here is a quick look at the reading room before...


...and after the transformation...


Layla has a knack for visualizing what a space can become with a little DIY effort, and she does a great job of accessorizing.

Well, believe it or not, she recently decided she wanted to transform this little room AGAIN. And she shared it with her readers last week.

I thought I'd share just a few of the pictures with you.

REDESIGN #2: Stripping it down...


Layla (and her hubby) cleared out the room, patched the holes in the wall, built a new bed platform with storage and much more.

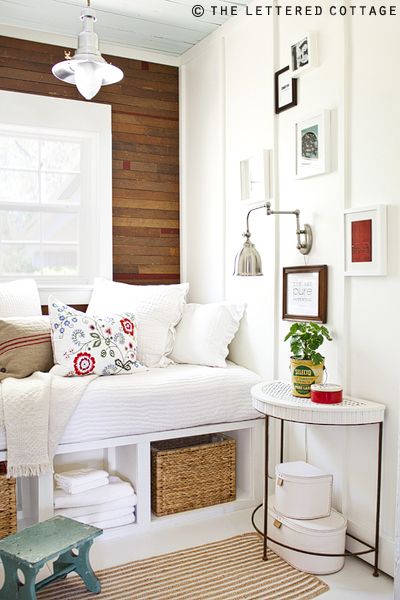
And here is the NEW LOOK...


...believe it or not, the back wall is covered with old gymnasium flooring they purchased at a salvage shop. For the board and batten on the side walls is pre-primed MDF 1×2′s from Home Depot.

I love the fun, colorful pillows. Many of the pillow covers were purchased at Ikea.


On the left side of the room, they used a leaning ladder as a magazine & book rack...


Layla decided to go with a random arrangement of photos on the right side of the room. It adds an interesting perspective. Many of the photos are for sale on their blog.


What can I say? Another fabulous transformation by Layla. Her creative ideas are never-ending...


To read the full blog post, including how they built the platform bed and installed the gymnasium flooring on the wall, and to see a list of all the sources used in the room, click HERE. Pin It
Visit InfoServe for Blogger backgrounds.