As many of you know, we officially moved into the house this past Sunday. Moving day went very smoothly and we had much help from friends to lighten the load. As it was about 89 degrees with high humidity, we wanted to make the process as short as possible for all involved. So, we rented a moving van to also make the process faster. Thankfully, we got almost everything moved over on the first trip with just a few things leftover for the second trip. It also helped that we had moved a lot of the little stuff over by car throughout the week.
Here's our friends, Lauren and Dan, helping unload the truck. I got to "direct" where everything should be placed.
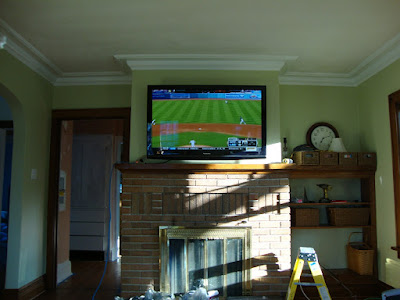
After we had moved everything over, Joey decided the first thing that needed to be done was to mount the TV over the fireplace. And since nothing else would get done until that was done, I let him proceed. Our friend, Tim, came over to help with the mounting.
Many holes were placed in the plaster wall to locate the studs that will hold the bracket in place (a stud-finder wouldn't work due to the multiple layers of plaster). Thankfully, these holes will be covered up by the TV.
The TV was mounted ever so carefully onto the bracket...
Joey measured to make sure the TV was perfectly centered...
And then tilted it for the right viewing angle...
End result: Great picture. Perfect for movie watching. And though not my "decor" preference, it's very practical since you can easily view the TV from everywhere in the room, and it doesn't take up floor space we need for seating. Marriage is about give and take, and in this case, I gave Joey the option to put the TV anywhere he wanted. And he took me up on that offer.
June 30, 2010
June 28, 2010
Trash Talk
Saturday was a day for preparing for the big move. Part of the preparation process included getting rid of all the garbage that had accumulated in the garage over the last few weeks. Thankfully, going to the dump is a "man" job, and I was able to happily hand that job over to Joey and my brother, Adam. So, Joey and Adam spent the morning taking loads of garbage to the dump and cleaning out the garage (to make room for the arriving kitchen cabinets). This was one of the dirtiest projects I've seen in a while, but I was ready to say goodbye to the old shag carpet, 3 layers of kitchen linoleum, and junk that was taking up much needed space.
Here is the trailer - 4 cubic feet of space - 2 trips were required to get rid of everything. Special thanks to mom and dad Yonke for letting us borrow the jeep and our friend, Carlo, for letting us borrow the trailer!
Here's a cool "action" shot Adam took of Joey throwing junk into the trailer.
At the dump, a big compacter squished all the garbage together. Goodbye junk!
The Final Load... feels so good to be done! Time for showers!
June 25, 2010
Go Green...
...with Paint! Our Living Room and Den are now complete with a nice coat of green paint. I chose the color "Willow Wind" (like a sage green) for both rooms. I love the color green, especially in a "living" space. The walls were previously ivory, and that color just made the room feel unfinished, boring, and dingy. Adding the green paint to the walls made the room feel brighter and accented the wood trim and plaster crown molding so beautifully.
Here's the Living Room/Den before the paint (yawn)
And here are a few pictures of our green and move-in-ready living room and den! Gotta give credit to 2 of our friends, Matt Tinkham and Jan Nye, for all their help with the painting!
Note: color may vary slightly depending on your computer and you can click on individual pics to make them larger :)
You especially notice the green up at the ceiling by the molding.(ignore the shop vac out in the hallway)
Up close picture of the plaster molding by the fireplace
In this pic, I'm standing by the fireplace and looking into the Den off of the Living Room (the den is the very front of the house with windows lining the 3 main walls).
Here are 2 of my favorite features of the room.
#1 - this beautifully stained wood door with beveled glass, which leads into a small foyer area by the front door.
#2 - the built-in bookcase next to the fireplace. Joey and his dad just added an outlet at the back of the bottom shelf for us to plug in our Blu-ray player, receiver, video games etc... And as you can see, I've begun to bring over some baskets and things from our apartment.
The only think left to do (besides all the decorating) is fix up the fireplace. We are going to paint the brick white, replace the floor tile in front of the fireplace, and get a new surround. More to come on this project!
June 24, 2010
Surprise!
I walked into the house last night only to find out that Joey had installed our entire kitchen floor during the day! And I had been asking him earlier that day "when are you going to get those kitchen floors in?" And even at dinner, I asked "did you rent that nailer to do the kitchen floors?" And he just grinned and said "yes" (very vaguely). And I pretended not to be annoyed all while thinking "I wish he would just get 'er done!"
Well, the joke's on me! Cause they are done. And they look great! But let's back up a little bit to see what we (Joey) had to go through to get them to the finished product.
When we bought the house, the kitchen floor had a nice 80's/90's linoleum laid down. We thought there was the possibility of hardwood floors underneath since that's what the rest of the floors in the house consist of, but knowing they would probably be in bad shape anyway, we had already bought new hardwood flooring for our new kitchen.
Well, as Joey began to peel back the linoleum, he found another layer of linoleum underneath that and another layer of linoleum underneath that, and definitely no hardwood floors (good thing we had already bought the new stuff). It looked like a new layer of linoleum was laid down every 15-20 years.
So, Joey had to rip up all 3 layers of linoleum plus some plywood in between the layers to get down to the subfloor underneath.
Once the subfloor was exposed, we decided we didn't like quite so many "squeaks" in the floor. A few little squeaks are ok (it's called "character"), but a lot of loud squeaks are just plain annoying. So, using a chalk line, Joey outlined where the floor joists were below and then took his nail gun and bolted those subfloor planks to the joists. And "presto chango" - no more squeaks!
Final step - Joey laid down tar paper over the whole floor, and then cut and nailed down our new distressed hickory hardwood floors. I can't begin to describe how excited I was to see the end result when I walked into the house!
Here's an up close view. The planks are 5 inches wide. You can see some of the grain, knots, and "distressing" in the wood. It complements the refinished floors in the living and dining rooms very well. It's just a slightly darker shade than those floors.
What's next in the kitchen? Well, cabinets should arrive sometime between Friday and Wednesday. So, maybe I'll have 1/2 a kitchen by move-in time!
June 22, 2010
Master of Perfection
As we are working to accomplish many tasks in a short period of time at the house, we finally have 1 room completely painted and basically move-in ready. What room is that, you ask? Why, the Master Bedroom of course. Since we will be moving into a partially finished house, I wanted one room to be completely finished so that we could relax in the room at night without staring at all that still needs to be done.
So, here is a "before" picture of the bedroom. Gotta love the baby blue curtains that Betty (former owner) hung in the windows! And that nice ashy-brown trim! (sarcasm intended)
You can see there was a lot of "stuff" lying around when we bought the place...
We started changing things up by painting all the trim a nice, clean white. It really makes the tall baseboards stand out so you notice their height and grooves...
Then we painted the walls "khaki" which warms the room and makes all the white trim really "pop" against the walls. I love this color and I'm very happy with the results.
Here's a built-in along one of the walls. It has really deep, large drawers for storing a lot of clothing items. The drawer pulls were special ordered and should arrive in a few days to top it all off. The top shelf above the drawers is coming out and Joey is going to mount our bedroom TV in that space. Our bed will be adjacent to it which will make for great movie watching!
Included in the Master Bedroom is a little room on each side of bedroom. The first room below is being used as a walk-in closet. You can also kind of view this in the pic above. Having a walk-in closet is very unusual for a house of this age, but a big bonus for us!!! And the other little room on the opposite side is pretty much a blank slate. It does have a little built-in desk (not shown), but I will probably add some shelves and use it for more storage. I love that each "closet" has its own window for lots of light. The only thing left to do is replace the lights on the ceiling and add some curtains for privacy.
I can not wait to start decorating this room. It needs window treatments, an area rug, and pictures on the wall. I'd like to get some new bedding too. But I'll be happy with it as is for now!
June 21, 2010
Re-Think. Re-Do. REJOICE!
One of the joys of being a new homeowner is the constant change of plans that we encounter as we're working our way through the fixing-up process. If you remember from this post, we originally thought that the hardwood floors in living area of the house would not need much work except for a good cleaning. Well, we were wrong. The carpet pad had been sitting on the floors for so many years that it actually took some of the finish off the floors and the pattern it left behind could not be scrubbed away. So, the only option was to do some sanding.
Here you can see the pattern on the floor that we tried to "wash" away...
So, we went to Plan B. Joey rented a sander to try and take off the top finish of the wood so that we could (hopefully) avoid re-staining the floors and just remove the pattern on top and then put down a new layer of polyurethane. Doesn't he look like a professional?
But after a few hours of sanding, Joey realized it would be impossible to just remove the top layer and we would need to go through the full sanding and restaining process. However, doing it with the rental sander would involve sanding the entire floor 3 separate times with 3 different grits of sandpaper. This would take FOREVER. And make a huge mess...
So, we moved on to Plan C....
Hire the professionals! Joey got quotes from 4 or 5 guys on what it would cost to refinish the floors in the Living Room, Den, and Dining Room. We got a huge variety of prices, but in the end wound up with close to the cheapest price, but with the most professional guy who could do it in the shortest amount of time. Score! And he had a nice sander that kept dust to a minimum - didn't even spread to any of the other rooms!
So, the sanding took place in 1 day. Here is what the floor looked like after being sanded down to the bare wood.
We then had multiple stain colors to choose from (like 20). We picked the 3 we liked the best and tried to match the wood tone we were installing in the kitchen. He did a little sample for us on the floor so we could get a better idea of what the color would actually look like with the wood grain. We chose the stain on the left called "Special Walnut". It was the medium tone of the 3 colors we picked out, and I thought it complemented the trim the best without being too matchy-matchy.
The guy also filled the little nail/staple holes from the old carpet staples and tack strips.
He then put 1 layer of stain on the floor...
...And then 3 layers of polyurethane for a nice, shiny, protective finish.
So, here is the "before" color (very golden/orange)
And here is a side-by-side comparison of the old and new (we're putting carpet back over the hallway where some of the old stain still exists).
And here are some "after" pictures of the newly stained floor.
Looks like a nice Chocolate brown. Yummy!
Dining Room...
...and Living Room/Den! You can't even tell where Joey did the repairs in the floors!
This is the best decision we've made so far!!! The floors look beautiful. So, warm and rich looking. The grain of the floor stands out now and it complements the other brown tones in the trim and woodwork. I can't even believe these floors are 80 years old! They look like new!
If only we had the money to refinish the 3 bedrooms and the stairs... guess that will have to wait!
Here you can see the pattern on the floor that we tried to "wash" away...
So, we went to Plan B. Joey rented a sander to try and take off the top finish of the wood so that we could (hopefully) avoid re-staining the floors and just remove the pattern on top and then put down a new layer of polyurethane. Doesn't he look like a professional?
But after a few hours of sanding, Joey realized it would be impossible to just remove the top layer and we would need to go through the full sanding and restaining process. However, doing it with the rental sander would involve sanding the entire floor 3 separate times with 3 different grits of sandpaper. This would take FOREVER. And make a huge mess...
So, we moved on to Plan C....
Hire the professionals! Joey got quotes from 4 or 5 guys on what it would cost to refinish the floors in the Living Room, Den, and Dining Room. We got a huge variety of prices, but in the end wound up with close to the cheapest price, but with the most professional guy who could do it in the shortest amount of time. Score! And he had a nice sander that kept dust to a minimum - didn't even spread to any of the other rooms!
So, the sanding took place in 1 day. Here is what the floor looked like after being sanded down to the bare wood.
We then had multiple stain colors to choose from (like 20). We picked the 3 we liked the best and tried to match the wood tone we were installing in the kitchen. He did a little sample for us on the floor so we could get a better idea of what the color would actually look like with the wood grain. We chose the stain on the left called "Special Walnut". It was the medium tone of the 3 colors we picked out, and I thought it complemented the trim the best without being too matchy-matchy.
The guy also filled the little nail/staple holes from the old carpet staples and tack strips.
He then put 1 layer of stain on the floor...
...And then 3 layers of polyurethane for a nice, shiny, protective finish.
So, here is the "before" color (very golden/orange)
And here is a side-by-side comparison of the old and new (we're putting carpet back over the hallway where some of the old stain still exists).
And here are some "after" pictures of the newly stained floor.
Looks like a nice Chocolate brown. Yummy!
Dining Room...
...and Living Room/Den! You can't even tell where Joey did the repairs in the floors!
This is the best decision we've made so far!!! The floors look beautiful. So, warm and rich looking. The grain of the floor stands out now and it complements the other brown tones in the trim and woodwork. I can't even believe these floors are 80 years old! They look like new!
If only we had the money to refinish the 3 bedrooms and the stairs... guess that will have to wait!
June 18, 2010
Sneak Peek
Much is happening in the Yonke villa. There are so many things going on at one time, it's hard to keep track of it all. But the place is sloooowly starting to be put back together in some respects so we can begin to see what it will like upon completion (although we all know it's never really "completed"). I'm very excited about what I'm seeing so far!
Here are a few sneak peeks of what's been happening the last few days with more details to come...
We are replacing the windows in the kitchen. Here you can see Joey has taken out 2 of the old windows and so there's a gaping hole in the kitchen. He's boxing in part of wall where the old window fit to actually shrink the window size so that we can fit cabinets and countertop around the new windows.
We're doing a little sanding and staining too... just wait for the end result!
And the painting of walls has begun in the Master Bedroom! With the help of our friend, Carlo, and my dad, this should be completed soon...
Stay tuned to see the outcome...
Subscribe to:
Posts (Atom)