May 31, 2011

The 3-Day Weekend

Welcome back from what I am presuming was 3-day weekend for you! I hope you had as great a weekend as we did! Most of the weekend was spent visiting my parents in Michigan. It was fun and relaxing and (mostly) injury-free (minus a little spill I took down the stairs...clumsy me)! Monday was filled with a little work around the house along some fun that included lunch with the Joey's fam and a movie with friends (Kung Fu Panda 2 - great movie!).

And at some point during the weekend, summer decided to make an appearance.

Hello, Summer!
It's nice to meet you again. I've missed you for the many, many months that you've been away. Please reprimand old man winter and tell him not to keep you hostage for so long next year. I'd be oh so grateful.

Yours Forever (or until Autumn arrives),
Katie

Moving right along...

Part of our time in Michiana (interpretation: Michigan + Indiana = Michiana) was spent shopping around looking at some country shops, vintage shops, and antique shops near Shipshewana, IN. Mom and I had a lot of fun browsing around and looking at all the items we wished we could buy (but didn't).

Here is a small variety of what peaked my interest...

One shop was full of cottage-y decor. I love the wooden ships with writings on the sails. If I was decorating a coastal cottage, this would definitely be the place to shop!


Another store I adored was full of vintage items. The picture below shows a small section that had all kinds of vintage laundry items - like old irons and ironing boards. It would be so fun to decorate a laundry space with a retro look like this...


Another reason I loved the store was because it was full of wooden letters, and signs with a lot of typography. I heart typography. Most of the letters were priced at around $5 each.


One of the tables I loved in the store was made from rulers and yardsticks on top. It cost around $400. I found it interesting and thought it would be fun to use in a home office or schoolroom.


The store was also full of many hilarious, vintage signs. We cracked up at some of the sayings like the one below...


"Mommy has a headache. You kids go play in traffic." ... I'm sure my mom thought that several times while we were growing up!

The last shop we visited was a large 2 story antique mall. We didn't have near enough time to look at everything (the men were tired, bored, and practically ushering us out the door by this time of day). So, we'll have to go back another time. Here are my 2 favorite items.

This first item is a little 1940's chest of drawers. I loved the curved front. This would look great with a coat of paint and a bit of distressing. It's the perfect height and size for a kids room. The cost was $85, and I would have bought it in a heartbeat if we had room in our car and $85 cash with us.


The second item is an old catalog chest. It may have been in a library originally. It was huge! And beautiful! And only $4,000 (womp, womp) ...guess I'll be saving up for a while to buy this one. Oh, and I also love the stenciled numbers above each drawer!


So, that pretty much sums up Saturday. Sunday was spent hanging out at my parent's house, and our good friends Jimmy and Erica (and the kiddos) drove 2 hours from Ft Wayne, IN for a short visit. It's always a good time with them! We left that evening and arrived back at the homestead around 10:30pm.

As I mentioned above, Monday involved some work around the house, which I'll expand on at a later time. But I also wanted to mention that Monday was the 1 Year Blog-iversary of J&K Homestead! Just like with the purchase of the house, I can't believe it's been 1 whole year since this whole blog adventure started. I've learned much along the way and continue to grow in my experiences with blogging, photography, homemaking, renovating, and decorating.

I hope, someday, to be able to walk my kids (and perhaps grandkids) back through the writings and photographs captured here so that they may grasp the wonderful experiences that Joey and I have shared together during this part of our marriage.

As always, a big thanks goes out to you, our readers, for taking time out of your day to read and comment on our little adventures! It wouldn't be the same without you! XOXO

So, now that I've rambled on and on, tell me, what did you do for Memorial Weekend?!


Pssst... Remember to check us out on Facebook and Pinterest if you haven't done so already!

May 27, 2011

Guess What Today Is?

Hint, Hint...read our profile on the right side of the page...

Did you see it?

Today
.
.
.
is
.
.
.
our
.
.
.

1 year HOMESTEAD-iversary!!!

Holy cabooses!

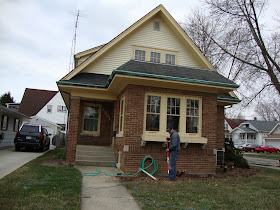
Yes, one year ago today, Joey and I became proud first-time homeowners of our little bungalow in Kenosha, WI. I actually just realized this as I was sitting at my office desk this morning. That's how fast one year went by!

Home ownership has given us much joy and also taken much of our time/energy/money. But it's so worth it! While our to-do list is never ending, it's always good to take time and look back to see just how far we've come in 1 year. So, I plucked a few photos from past blog posts to give you a little comparison of "Then" and "Now".

This was the outside of the house in February 2010 when we toured it for the first time...


The outside has changed only because we've spend so much time ripping things out (like those big bushes), but not much time (yet) putting things in. That should change this summer.


The porch in the back of the house was one of the first projects we worked on...


I still appreciate the transformation every time I walk through the porch and into the kitchen. It still needs to be decorated though...


The Master Bedroom upstairs also got painted pretty quickly in preparation for moving day, but has slowly evolved over time...


...into what it is today. It is our sanctuary at the end of the day.


The Living Room was one of the most awful rooms in the house with 30 year old brown shag carpet throughout...


...but it is now one of the most completed rooms with refinished hardwood floors and fresh paint on the walls. We still need to complete the rest of the fireplace transformation, add curtains to the windows, and fill in a few decorations. This picture was taken in February right after we got the new sectional sofa (you can see that tags are still on it).


The first floor powder room was probably my second least favorite room in the house. The gray, plastic tiles had to go...


Even though we kept the gray and white color scheme, the space is a bit more up-to-date with a tiled floor and beadboard walls. (still missing some decor and curtains)


After loading these photos today, I realized 2 things:

First, all of my "Before" pictures are HORRIBLE. At the time they were taken, I was just snapping the pictures hurriedly as we toured through the house in order that Joey and I could review them at our apartment while we were considering buying the house. I now wish I had taken additional (better) pictures after the purchase, but we moved so quickly into demolition mode that I completely forgot about it.

Word of advice to new home-buyers: Take a lot of good photos before you start changin' things up!

Second, I definitely need to get some up-to-date pictures of full rooms in the house. I have many pictures showing little details in rooms - one wall here and one wall there - but not many showing the full scale of the rooms. In fact, the last picture taken of the kitchen was in NOVEMBER 2010, and it wasn't even a full shot of the kitchen. Not good. So, that's been added to my to-do list in the next week or so.

All-in-all, I'm so thankful for how the Lord has provided for us this past year - even more than I could have dreamed. We've already built so many memories in this first year at the homestead, and I hope there will be many more to come!

Thanks to all our readers for riding along on this journey with us!

May 26, 2011

King Me!

No, I'm not talking about checkers.

When we were first married, Joey built me a king-sized headboard for our master bedroom. At first it was painted black, but a year or so ago, it was painted white. It looks like this...


The reason we needed a (mostly free) king-sized headboard is because one of the first items we bought with our wedding dough was a brand spankin' new pillow-top king-sized mattress set. And let me tell you it's the most comfortable mattress set on earth...just ask my mom (but don't ask why my mom knows the comfort level of our mattress set).

Joey and I will be married 7 years in July. That tells you just about how long we've owned this king-sized bed and headboard...yes, almost 7 years.

Guess what I haven't owned in these 7 years?

KING-SIZED PILLOWS!

Did you know these exist? Yes, they do. In fact, most of the king-sized sheet sets we received as wedding gifts came with king-sized pillowcases. But since we only had regular-sized pillows, these extra large pillowcases just flopped over the edge of the pillows and most of the time got tucked back behind the pillow. It's all kind of sloppy looking.

And since I'm an avid bed-maker, I quickly noticed that it takes 3 regular-sized pillows to stretch across the width of the king-sized bed. It just doesn't look right.

So, I was in Bed, Bath, & Beyond the other day (with a 20% off coupon), when I spotted some lovely on-sale king-sized pillows. A light bulb went off, and I bought them. Total impulse purchase, except that it had been nearly 7 years in waiting anyway. The king-sized pillows cost something like $18 each.


I wasn't overly concerned about the comfort level of these pillows as they would not be our "sleeping" pillows. They're decoration on the bed (most men - and some women - don't get the need for decorative pillows, but I'm telling ya it's a necessity).

Eventually, when I buy all new bedding, I will get purdy king-sized pillow shams to go on these pillows, but for now, they got (also new) chocolate brown pillowcases (sorry mom, I didn't iron them first).


Notice how 2 pillows now cover the width of the mattress (the headboard is a little wider then the mattress)?

And why the chocolate brown color, you ask? Well, these are the three reasons I quickly came up with during this impulse purchase... #1 - I wanted a high-contrast color against the white headboard. #2 - The new matchstick roman shades in the window along with the baskets in the nightstands are a chocolate brown color and I felt the need to add this color to other places of the room. #3 - I like the warmth and richness yet neutrality of the color. It sort of grounds the other pillows on the bed.

Speaking of other pillows, I threw my long body pillow on the bed after the new brown ones. Luckily the green pillowcase that has been on this for a couple years blends right in with our new green/pumpkin/brown/tan/white color scheme. Lastly, I added the 3 decorative pillows my mom made when she helped make the bedroom curtains.


Nice and tidy, right?

The only problem is that there are no "sleeping pillows" on the bed in these shots.


That's because there are actually 3 other regular-sized pillows (I didn't include them in the picture above) that we use for sleeping. I will eventually purchase 2 more king-sized pillow to replace these, but I want to be sure to get really comfy pillows that are just right for each of us (Joey likes his pillows pretty flat and I like them a bit puffier). So, those will come sometime soon.

In the meantime, I hide the 3 wrong-sized pillows behind the king-sized brown ones, using white pillowcases to help them blend in with the headboard...


...not even Spike notices them!

Hey, you gotta do what works for now, right?!

May 25, 2011

(P)interest Love

A few updates to my pin boards!

DIY: Amazing cut-out canvas project. Would love to try this.


Living Room Inspiration: Great fireplace!


Organization Nation: Organize your cookie sheets by using tension rods in the cupboard or pantry. Genius!


Bedroom Inspiration: Like the curtain doors and horizontal boards on the walls!


Living Room Inspiration: Love the color scheme, nail-head trim on the ottoman, and the bird picture! (photo suggested to me by Erica)


Happy Pinning!

May 24, 2011

And The Green Grass Grew All Around, All Around...

Remember that song from childhood? It's the kind of song that gets stuck in your head and you sing it over and over and it never leaves. I have a fond memory of my brother and I singing it really loud together on the school bus in junior high and everyone on the bus grinning and yelling "shut up" when we were done. Anyhoo...

What I want to share with you today are a few snap shots of the green grass that is FINALLY starting to grow in our bare naked yard. A few weeks ago, I shared with you that we were beginning to plant new seed in the yard where we had ripped out plants, bushes, flowers and the like. It looked something like this once Joey had the seed laid everywhere...


We had heard that we should see fast results with the good seed that Joey bought (Scott's EZSeed Turf Builder) and should see some grass sprouting up within a few days. Joey made sure to wet the ground thoroughly when it got dry and follow every instruction by the book, but I don't know if it's the cold-ish weather we've had or the fact that our yard is very shaded in the grass-growing regions, but a week later not a single sprout had come up. Boo.

I got a bit discouraged, and we were beginning to give up hope when a few days later, I came home from work and spotted some grass. Woo Hoo!


This poky new grass finally started showing its head through the soil allowing me to envision what this side of the house will look like with more grassy area...more for Joey to mow, less for me to weed when we plant flowers.

And another week later, it looked even thicker...


...and the areas around the tree trunks are starting to fill in as well...


We're praying for good weather on Memorial Day to do some more yard work and maybe even get a few flowers in the ground. We'll just have to wait and see what mother nature gives us that day!

May 23, 2011

Houzz It Going?

Welcome to Monday! I had a great weekend, and I hope that you did too!

As a little follow up from my post on Friday (see here), I wanted to share with you 3 other pictures I found on Houzz's website that I love. For each picture, I included 6 reasons why I love the room that's being photographed. Enjoy!


Picture #1: Home Office/Craft Space


1. White Floating Shelves: They make the space feel very airy, but still provide a place to store items in baskets, canisters, and jars. It creates more interest in the room to break up a row of cabinets using shelves.
2. Farmhouse Sink with legs: Not only is this sink beautiful, but what a great addition to a craft room. Very practical for washing hands or watering flower arrangements as shown above.
3. White Cabinets with Marble Countertops: So simple, classic, and clean looking! I don't think I will ever grown tired of this look. If you wanted a little more color in the space, you could paint the cabinets gray or a smoky blue. That would be fun!
4. Marble tiled floor: This floor coordinates with the marble countertops, and the variety of color in the marble adds texture and warmth to the space.
5. Area Rug: Given that a tile floor can be a bit hard and cold on the feet, an area rug is great for adding a bit of warmth and comfort.
6. Painted Stenciled Wall: I love the contrasting dark gray color compared to the white walls around it. The stencil adds a pretty pattern to the room.


Picture #2: Family Room/Game Room


1. Rustic Wood Beams: The first thing I noticed in this space were the beams. They do a great job of outlining 3 distinct areas of the room (game table, pool table, living room). The rich color of the wood beams (in addition to the wood floor) warm up an otherwise mostly white space.
2. Table area for Board/Card Games: This is such an intimate little area. I love that a few people can gather around this table for a game while other people may be mingling in the rest of the room. Note that the small area rug on the floor also helps to define it as a separate space.
3. Pool Table area: I love playing pool. I would love a beautiful wooden pool table like this. Amen.
4. Living Room area: This is another distinct area of the room, but I like that the TV is still visible over the couch for viewing in the game and pool areas. It keeps everyone in the room connected while watching a football game or a movie.
5. Rustic Wood Door: I think this door is so charming. It looks handmade. Again the rich wood tones stand out nicely against the white walls.
6. Board and Batten Walls: I'm convinced that it doesn't really matter what color you paint your walls, as long as you have some type of wood molding or wainscoting on them (like board and batten), they will look beautiful. Even the color white does the trick in this room.


Picture #3: Little Girl Bedroom


1. Honey Bee Wallpaper: While I have vowed never to use wallpaper in my house (due to the nightmare-ish experience of removing so much of it), I can't help but love the vintage feel of this wallpaper pattern for a child's room. It's so charming.
2. Clip-ring Curtains: I like that these curtains only extend to the bottom of the window rather than the going down to floor. This gives them a child-size proportion to the space. It also allows more room for furniture along the walls.
3. Cozy Bed: This upholstered day bed looks perfectly tailored for this room. By having it hugged up against the corner of the room, it creates the perfect nook for reading and sleeping.
4. Area Rug: The woven fabric also has a warm old-fashioned feel and pattern to it...like something you would see in an old farmhouse.
5. Twig Lamp: This lamp has such great character and brings a child's imagination to life. It fits into the honey bee nature theme too.
6. Nightstand and Chair: Both are made using a dark wood stain that stands in contrast to the white and yellows around them. They also reflect nature being left in their natural state rather than being painted.

I continue to enjoy exploring the thousands of pictures on Houzz's website. Although, it appears they do not want their photos to be pinned on Pinterest (boo). I'm guessing that's because they want you to use their own Ideabooks. One way around that is to link out to the original website the picture came from and pin it from there instead (my tricky mind finds ways around most obstacles)! Happy Houzz browsing!


Pssst... In case you didn't notice, J&K Homestead created a Facebook Page over the weekend (http://facebook.com/jkhomestead)! Woo Hoo! You can click the "Like" button to the right side of this website to join the page OR click HERE to be re-directed to that page! Thanks to all who "Liked" our page! It's much appreciated!

May 20, 2011

Houzz Inspiration: Another Great Resource

Has anyone else checked out the Houzz website?


This site is just loaded with oodles and oodles of inspiring home photos (around 130,000 photos as seen above). The site allows you to create what they call Ideabooks to save your favorite pictures. I did not create Ideabooks through this because I use Pinterest for saving my inspiriation, but I'm sure this would work well too.

The site allows you to search through the photos in 4 ways:

  1. By Style (Asian, Contemporary, Traditional, Eclectic etc)
  2. By Space (Bathroom, Kitchen, Living Room etc)
  3. By Metro (Atlanta, Chicago, Seattle etc)
  4. General Search bar to type any home/design-related term you want to research
I found that most of the photos I love are in the Traditional category - like this beautiful kitchen.


2009 Showcase Home on Park Alley traditional kitchen

Once you select a photo view, the site is set up with all kinds of information about the photo. When you scroll your mouse over the photo, green tags appear...


...and each green tag provides information about the product in the room. So, if I scroll over the green tag on the light fixture, it tells me the details...


Below the photo are listed several different actions you can take regarding the photo, including adding the photo to your ideabook (I just pin it onto my Pinterest boards), email the photo to yourself, or ask a question about the photo...


Below the photo is a place to leave comments or ask questions. And guess what? You actually receive answers to your questions from the owner of the photo!


To the side of the webpage, is a list of all the photos from the house where this kitchen photo was taken...


It includes other angles and more detailed shots of this kitchen I love so much. Here are the many things I love just about the sink area...


So, what do you think? Pretty great resource tool for home design lovers, right?

Check out Houzz for yourself by clicking HERE!

May 19, 2011

Brother Bonding Time

About 4 weeks ago, I shared with you the process of taking down the big ugly bushes that lined the front of our house...


Joey hacked them with a chainsaw to get them down to the stumps, but didn't have much luck after that of removing the large stumps and roots systems from the ground. And so they've sat for 4 weeks untouched...


...that is until Friday night last week. Joey's brother, Jared, was spending the night and they were playing around outside in the later part of the evening when all of the sudden I started hearing loud noises coming from the front of the house. So, I wandered outdoors and found a few surprises.
  1. Joey was borrowing his parent's suburban for hauling a trailer full bushes (the ones we pulled out of the front yard) to the dump Saturday morning, and I found said suburban parked 1/2 way into the front yard and 1/2 way on the street. I pictured a car driving by at any moment and plowing into the back of it.


  2. There were silver chains attached to the suburban and the stumps. My first thought: where/when did Joey get these chains???


  3. Jared was the one at the driver's wheel (he has never driven before - no permit, no driver's license).


  4. There were already 2 or 3 stump/root clumps laying on the front lawn...


All of this intrigued me. Joey explained that he was digging big holes around the stumps, cutting the roots with a chainsaw as best possible, and then having Jared yank them out of the ground using the chains.


As concerned as I was regarding the lack of safety measures being taken, I allowed them to proceed. Sure enough, within an hour, all the stumps were out of the ground...


...and Jared had a chainsaw in his hand. He was cutting a white pipe that sticks out of the front of our house (for sump pump drainage). I asked Jared if he had ever used a chainsaw before, and he said "no". Hmmm...


Once the work was done and the yard cleaned up, Joey "rewarded" Jared for his help by letting him drive the suburban from the front yard around the corner of the street and to the side of the house where our driveway sits. There's nothing like one brother teaching another brother how to break the law.

I thank the Lord we still have garage doors in one piece. And at least we were able to check one more item off of our yard to-do-list!


P.S. To my mother-in-law, I had nothing to do with this. Blame your eldest son.