August 31, 2011

Texture, Organization, and a Reminder

Thought I'd share with you a few new additions to my Pinterest Boards. I keep coming back and looking at them because I love them so much.

1. I'm assuming this first photo is a shot of an entryway or mudroom in the house. But what captures my eye is the chevron-patterned boards on the wall. In fact, it hypnotizes me. It's rustic and gorgeous. Give me chevrons. Give me boards. I heart.


2. This hallway is all about simplicity meets texture. From the wainscoting on the lower 2/3 of the walls to the grass-cloth wallpaper on the upper walls to the hardwood floors with the carpet runner in the center, you can't get much more texture than that! Yet the color scheme is neutral and not much decor is even needed to make it beautiful. The wall sconces and pendant light add warm charm. I also love the archways. It's all so interesting.


3. This next image was an instant re-pin item for many people. If I someday have a large laundry room, it will include an island for folding laundry and 1 laundry basket per family member! The picture below shows a clever way to store them all.


4. I LOVE this outfit. I love ruffles. I love orange and brown. I love trouser jeans. I want that purse. Pinterest has definitely helped me think about clothing in terms of whole outfits rather than just individual pieces. And yet every item below could be versatile and used with something else.


5. This quote below is an oldie (when it comes to my boards), but a goodie. I seriously need to print this quote, frame it, and hang it on the wall where I can read it every day.


Happy Pinning! Pin It

August 29, 2011

Treasure Hunting

Happy Monday! I thought I'd start off the week by sharing with you a few little items I've purchased over the last couple weeks. I've been shopping around looking for functional and decorative items for the home without spending a ton of money. I'm also thinking about the upcoming seasons and holidays and what might be useful for that time of year.

The first two items were purchased at Marshalls. You never know what you'll find at this store. Sometimes you find great deals. Sometimes you find nothing. Well, the day I was at the store I could have bought almost every dish/platter/bowl/pitcher in the aisle. But I practice restraint (by slapping my hand back as I would reach for items) and only bought two things.

The first trinket is this little ceramic bowl with a picture of a birdie, nest, and twigs/leaves around it. Most of you know about my bird-crush. It's no secret, and yes, I'm considering counseling. But this little $3.00 bowl I just couldn't pass up. It can be decorative for spring/summer/fall, and will look adorable holding little chocolate Easter eggs next March (or is Easter in April in 2012?). The greens, blues, and browns will allow me to use it in multiple rooms in the house.


Item numero dos is this gorgeous white platter. You see, a couple of years ago I broke a large white platter we owned and used for all kinds of things. We've been needing a replacement since then. This was only $15.00 (!) and has a beautiful shape. When we have grill-out parties in the summertime, Joey will have a place to stack all the meat. When not being used for food, I can display the platter by hanging it on a wall or setting it up for a table display. Per-fact!


The final item(s) purchased hail from Crate & Barrel. They are a pretty common item (as in, I know many women who own them), but I just can't get enough of them. Yes, it's the Parker Mini Bowl.


I bought 4 of them at $3.95 each: Red, Blue, Yellow, and Orange. I thought the variety of color would again allow for versatility in different rooms. The red will be great for Christmas. I can fill it with ornaments or chocolate kisses or potpourri. The orange bowl will likely be filled with candy corn for Halloween. I can do the red and blue together for 4th of July etc. etc. etc... LOVE!


So, what items have you added to your decor lately? Anyone have a thing for dishes like me? Tell me I'm not alone! Pin It

August 24, 2011

What Are You Falling For?

I'm falling for ... ALL THINGS FALL!

No, I'm not ashamed to admit that I'm done with summer and fall is calling my name. Big time. In fact, this past weekend I purchased 4 (very-on-sale) fall shirts/sweaters in preparation for cooler weather. I'm ready. I'm waiting...

Apparently, some of you are with me on this one because Pinterest is ablaze with fall-related decor, fashion, and themes. People are pinning away, and it has me, once again, inspired.

All I have to do is read the words below and I find myself craving the fall season like I crave chocolate on my ... well, you know what I mean.


If that doesn't get your heart beating for the next season of the year, here are a few more pictures that might do the trick. These pins sparked my interest and have me thinking about how I might implement the ideas in my own home.


And don't forget about using pumpkins to decorate the inside and outside of your home. There are so many inexpensive, DIY ideas to copy-cat this year.


What are you looking forward to the most about fall? The cool weather? The colorful trees? Breaking out sweaters and scarves? Hot Cider? Tell me I'm not alone here!

Pin It

August 22, 2011

"Up" : The Real-Life House

Anyone else seen the adorable Disney-Pixar movie, "Up"?


I love this movie. It makes me laugh. It makes me cry. It's a heart-warming story that I highly recommend if you haven't seen it.

One of the other things I love in the movie is the house that the main character, Carl, and his wife, Ellie, own. I'll not deny that the house/primary-residence-of-characters tends to preoccupy my eyes while watching movies, and animated movies are no different. The house in Up is just too cute for words, but apparently it's not too cute to duplicate.

That's right, someone built a real-life version of the Up house - making sure every detail was duplicated as best possible down to the the names painted on the mailbox.


A little ridiculous? Perhaps. Totally interesting? Absolutely!

In fact, the owner even greets tourist in character wearing the same outfit Carl Fredricksen wears during the movie.


Here are a few shots showing the interior of the house, including foyer, living room, and kitchen.


Wanna see more?

For additional interior pictures of the house, check out the Hooked On Houses blog HERE.

To read a news article covering this story (from the Salt Lake Tribune), click HERE.

Or check out this short YouTube video showing the opening of the house...

Pin It

August 18, 2011

Fireplace ReDo: The Breakdown

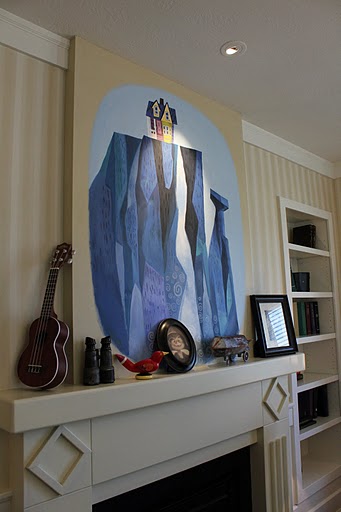
I promised you a little run down of the fireplace paint-over (results shown here), and so I'm here to try and make good on that promise. Just keep in mind that while this process worked great for us, it may not be perfect for every fireplace and everybody's situation. Just sayin'.

To start out, here are the products we purchased at the beginning of this project - 1 gallon of white concrete & masonry primer and some paint brushes.

I do recommend using a masonry primer to go over natural brick as this primer is made to cover the dirty, sooty, crevice-y surface and seal it so that nothing leaks through. We used the same thing when we painted the brick on our back porch. It worked wonders. You can see we picked ours up at Sherwin Williams, but any home improvement store is likely to sell it.


We also picked up a couple of paint brushes. Normally, purchasing high quality brushes pays off over time, but this is not the case when painting brick. Painting brick destroys the bristles of a paint brush, and you end up throwing it away at the end of a project. So, don't go high end. But you also don't want a super cheap brush where the bristles are falling out as you're painting. Hence, we went with a middle-of-the-road brush set. The big brush was used over the majority of the fireplace while the little brush was just used for cutting down the side edges along the wood trim.


We already owned the roll of paper and tape used to cover the floor around the fireplace. So, that was cheap free and easy.

Now for the painting process... Most experts would advise to try and wipe the brick down with a wet sponge in order to remove as much soot as possible and let thoroughly dry before painting. This is to prevent possibly bleed-through of said soot down the road. Now, this is probably great advice, but it seemed like a lot of work and the lazy side of me said to skip this part. So, I just went right to work painting the front of the fireplace. I used the big brush for the entire project, being sure to cram it into all the little angles of the brick leaving nothing un-painted. Masonry primer is very thick (like glue) and not easy to paint with. So, this alone took about a steady 2 hours (with a break here and there for a picture).


The next step was to tape the trim down the sides of the fireplace and then paint each side. This took another hour and half. The primer did a great job covering the dirty brick. Like a whole new fireplace!


To prevent any paint from peeling down the sides, we removed the tape as soon as the first coat of primer was applied. The edge was pretty straight. Only a few minor touch-ups were needed.


We wanted to give the primer a minimum of 24 hours to dry before assessing whether a second coat of primer might be needed. From what we could tell, no bleed-through occurred, and so the lazy way may have actually worked out (not that I'm promoting laziness or anything).

While the primer was drying, I worked on picking out the actual paint color to use on top of the primer. I went to the local hardware store to pick up some Benjamin Moore paint swatches. I ended up with about 20 "white" colors. You may think, "How can there be more than 1 white?" But trust me, there are about a million whites. And I knew the kind of white I wanted. Not to quote Mrs. Blandings again, but as she puts it, I wanted white, but "not a cold, antiseptic hospital white. A little warmer, but still, not to suggest any other color but white."


With all 20 swatches taped to the front of the fireplace, I was able to eliminate a few of the least-white samples and get down to 15 options in a matter of minutes.


I left the swatches up overnight to see what they looked like in the dark hours when the lamps were on as well as during daylight (since paint colors look different in different kinds of lighting). In the end, I chose the color Ancient Ivory. It was the perfect warm white without looking like a cream or off-white.


Benjamin Moore paint can be kind of expensive. So, you can take the paint swatch to Menard's or Lowe's or anywhere that will mix paint for you in order to pay less. We ended up going with Sherwin Williams paint like we did with the primer because it was convenient in location, not because it was the cheapest option. We bought 1 gallon of paint in a semi-gloss finish so that it would be very wipe-able should it get dirty again.


After putting up some new paper and tape along the sides of the fireplace (in case of paint splatter), we applied just 1 thorough coat of paint, we were done. It took about another 2-3 hours to do. I was shocked it didn't take 2 coats of paint, but it looked really good with just the one. And there is plenty of paint leftover in case we ever need to do some touch-ups.


Once the paint dried and I could see the final product, I was very happy with the color choice. It may be hard to tell the difference in the pictures on the computer, but the final color was exactly what I had in mind for the perfect white. And you could definitely tell the difference in person as the paint was being applied.


Once the painting was completed, we again removed the paper and tape shortly after to make sure no paint dried to the tape causing peeling. We were pleased no paint got underneath the tape either. I also took the tape off of the flue opener. It was still it's original oil-rubbed bronze self. Now it stands out against the white brick.


While the fireplace is about 90% completed, there are still a few details remaining. If you remember, we removed a brass fireplace screen at the beginning of the process. We still plan to attempt a little DIY paint-job on this item in attempt to re-use it without the cost of purchasing a new screen. So, I'll let you know the results of that project when it happens.


Also, we are considering adding some embellishments toward the top of the fireplace where a row of brick is recessed a bit. We're scheming up ideas now, but I'm not sure if we'll implement anything right away. We're gonna bask in the glory of the white brick for now.


So, there's the low-down on the fireplace painting process. In the end, we spent about $80 and 5-ish hours (over a span of 2 days) to get this completed. We feel it was totally worth the investment. I hope you enjoy seeing the final product as much as we do! Pin It

August 16, 2011

Fireplace Painted: The Results!

We did it! Well, I did it (mostly). I went with my gut instinct and painted the orangy-brown brick of our living room fireplace, and I AM IN LOVE with the results.


The whole fireplace looks brighter and cleaner and newer.


The details of the wood mantel and ORB (oil-rubbed-bronze) flue opener stand out now.


I love looking at it from every angle. Even with the big TV hanging above it, I still find myself staring at the fireplace. That's a good sign.


And all the other "whites" in the room - like the lampshades, decor on the bookcase, and crown molding - blend together as one statement.


And since there's nothing like a good Before and After shot, I'll indulge you...


Details about the painting process and color choice to come!

And tell me, what do you think? Was white the right choice? Share, share! Pin It

August 11, 2011

In the Groove(s)...

The fireplace is a W.I.P...you know, a work-in-progress. We've got some primer on the brick (the final paint color has yet to be applied), and it looks bright and fresh and way more "me" than the original dingy brown color.


Painting all the little grooves in the brick is a million times more time consuming than painting, well, anything else. So, the progress is a bit slow. However, I can already tell it will be well worth the effort in the end.


I'm starting to picture what Christmas decorations will look like hanging in front of the new color. But I'm getting a bit ahead of myself. Gotta finish painting first (and then get through 3 months worth of autumn and turkey day).

This was just a small preview. More pictures to come soon. Pin It

August 9, 2011

FP: Take 3

Well, it's been 8 months since I last broached the topic of our living room fireplace (see here). So, I guess it's time for an update on what will be part 3 of the fireplace redesign.

While I tend to love brick in a variety of colors and uses and would possibly even choose natural brick for a future fireplace, the more I live in our living room, the more I continue to not like the natural brick of our current fireplace.

Now, I've heard/read soooo many pros and cons on painting vs. not-painting brick fireplaces, but in the end, I have to go with my gut...er, my heart...which frowns at the dirty orangy-browns the brick is currently projecting into the room. So, we have (finally) decided to take the plunge and paint it!


Last night, Joey did some prepping of the space. He removed one of the trim pieces underneath the mantle to ensure no paint gets on the natural wood. You can see our hidden speaker and cable wires under here (shhhh)...


Joey also caulked down both the right and left side of the fireplace where the brick meets the trim and built-in bookcase. This will fill in the gaps where a paintbrush won't fit.


And that bright brass fireplace cover?


Well, it's been removed for now. I may try some DIY techniques to spruce it up before making a final decision on what will go back in front of the fireplace in the end. I also taped off the little bronze flu opener above the fireplace opening. I don't want paint on that either.


Last step was to tape some paper to the floor and tile to ensure no paint spills or splatters there either.


I'll admit that I'm nervous about this choice, but there's no turning back now. Wish us luck. This fireplace may not be the same tomorrow!
Pin It
Visit InfoServe for Blogger backgrounds.